To bring back this window after closing press F12. To re-enable permanently disabled tutorials use dedicated button in the options dialog.
GAME SCREEN
This is mLotro's game screen. It is the most complicated one, since it has a lot of information of convey while using limited space.
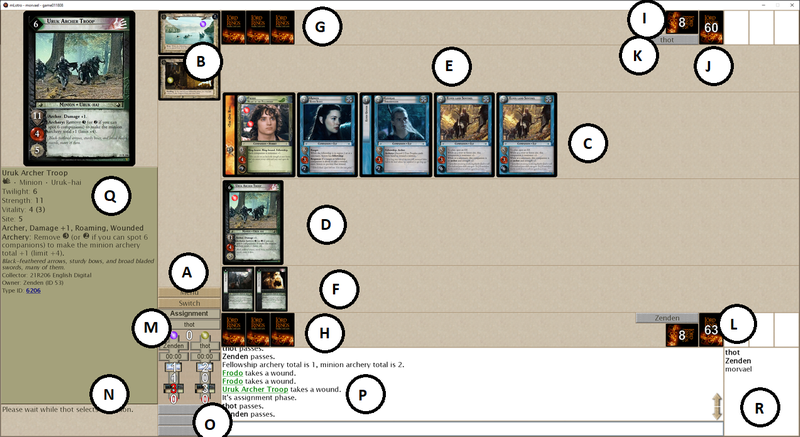
A - menu and switch buttons
You can use Menu button to exit from a game to main lobby, or to surrender at any time (double confirmation required for that).
The Switch button allows you to alter the main and support rows you see. To reduce clutter on screen Free People and Shadow cards of one player are not lumped together into one row. They are divided into main rows (Companions, Minions, Allies participating in combat; as well as their attached cards), and support rows (other cards, like Conditions; as well as their attached and stacked cards). These are in turn divided into Free People and Shadow rows, so that you see only the Free Peoples player's Free People main & support row as well as Shadow player's Shadow main & support rows. The view switches automatically as players change sides they play, but in case you need to check something in the cards you're currently not using (like Free Peoples player's Shadow cards), you can use the Switch button to toggle between the two views.
B - site path
Here you can see the site path, with first site at the top. In case sites no longer fit, this area is scrollable by the usual method (mouse wheel or dedicated buttons).
Hint:
- It's easy to miss sanctuary healing if the site is not visible.
C - other player's main row
Here you can see other player's main row (either Free People or Shadow). If you are playing the game, your cards are displayed always in the bottom half. If you're just observing a game, first player is at the bottom (as shown on the lobby screen).
D - your main row
Here you can see your main row (either Free People or Shadow).
E - other player's support row
Here you can see other player's support row (either Free People or Shadow).
F - your support row
Here you can see your support row (either Free People or Shadow).
G - other player's hand
Here you can see other player's hand (the cards are invisible of course, but you can see their number). If you're just observing a game, you won't see cards in either player's hand.
H - your hand
Here you can see your hand. In case you have to select a card from a deck or pile, a special selection row will appear that will temporarily hide your hand. Fret not, it's still there.
I - other player's adventure deck
Here you can see other player's adventure deck (face down). The number displayed on top is the number of cards in this deck.
J - other player's draw deck and piles
Here you can see other player's draw deck (face down), discard pile (face up), dead pile (face up), and removed from the game pile (face up). The number displayed on top is the number of cards in this deck or pile.
K - other player's marker button
This button makes it easier to determine whose cards are at the top.
L - your decks, piles & marker button
These work in a similar way to other player's decks, piles and marker button. The only exception is that your marker button might sometimes become enabled and light up in a green frame - it is used to execute global abilities that are not tied to a specific card. The same happens with draw deck and discard pile - some abilities work in those locations, and in this case draw deck or discard pile will light up in a green frame. Click on it to see a popup menu with commands that you can execute.
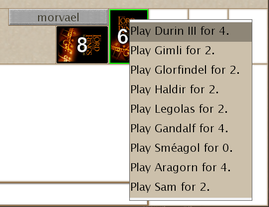
Hint:
- Right-click any of your piles during the game to browse its contents.
M - stats viewer
In this area you can see some extra information about the game. The values in order from top to bottom and left to right mean:
- The name of current phase.
- The name of current player.
- Current number of twilight tokens (between the violet and yellow player tokens).
- Name of the player (under the token they are represented with on the site path).
- Time remaining for that player (00:00 if timeout mode is not used).
- Site number of the site the player is currently on.
- The number of burdens on that player's Ring-bearer.
- The number of cards in that player's hand.
- The number of threat tokens on that player's dead pile.
Hint:
- Red number of cards in hand means that player has initiative.
- Red number of burdens means that the ring was put on by the Ring-bearer.
N - hint viewer
Here you will see some hints related to the decisions you have to make during the game, or an informaton that the game awaits a decision from another player.
O - decision buttons
Here you will be presented options to choose from during the game.

In case there are more than 3 options the last button displays a popup menu with all those extra choices.
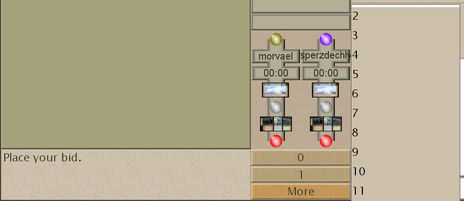
P - log
By now you know the log well. Remember, you can click on the green links to see the card. To prevent "perfect memory" by reading the log, it is limited to showing 100 last entries while playing a game.
Q - info viewer
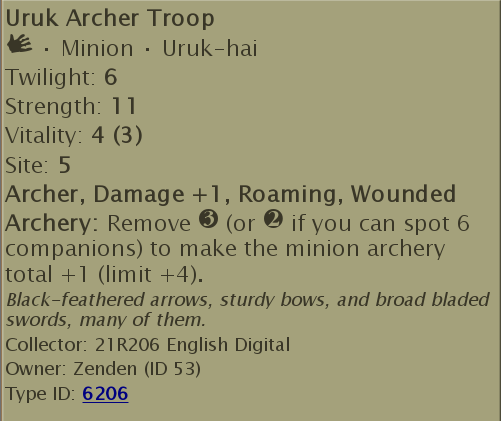
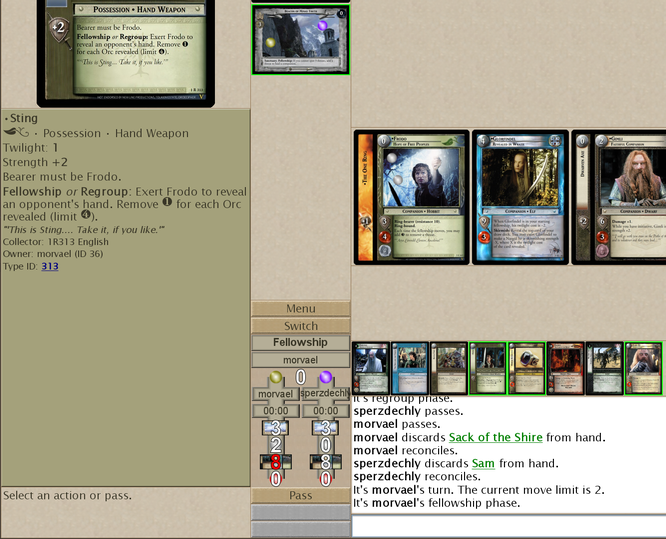
Remember, info viewer shows more than just original card parameters during the game. You will see here extra keywords, and modified attribute values. In the example below Roaming, Wounded and current vitality (in parentheses next to original value) are dynamic additions to card info:
R - players list
You know this too. Just a note - players are in bold, observers not.
WHAT NOW?
A game is a selection of interesting choices. In mLotro there are three main methods of making choices:
Decision buttons
By now you know those well:

Selecting cards directly
Cards that you select directly light up in red frame. Clicking the card means immediate selection:

Be careful, there is no undo!
Selecting abilities to trigger
Cards (and decks, piles & marker button) that have some abilities awaiting you to pick one for execution light up in green frame. You can safely click them to see available options:
Auto-select / auto-pass
Bear in mind there is such a thing as auto-selecting cards & abilities (in case there is just one to select, and it's not optional) and auto-passing (in case there is nothing to do, but pass). You can control this via options dialog (available on lobby screen). Default settings enable auto-select for everything, and auto-pass for everything except skirmish action (where bluffing is very important).
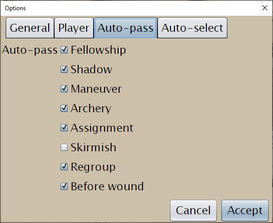
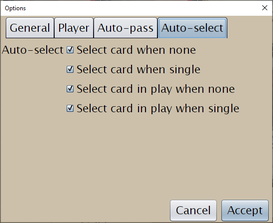
You can disable auto-pass for more phases if you want to bluff real hard, but remember it will slow you down (which is important in timed play).
No effect
The game is obliged to allow you to execute abilities that will have no effect (where allowed by the rules). So even though a card lights up in green for execution doesn't mean you really have to use them. The text in the menu should say "...for no effect" in such case.
Assignment
During preliminary fellowship and shadow assignment you can assign and unassign minions (even if you are the Free Peoples player), by using their generic ability (they will light up in green). As long as you don't press the Pass button, you will have the option to alter assignments. Only then will the actions caused by assigning trigger, if any.
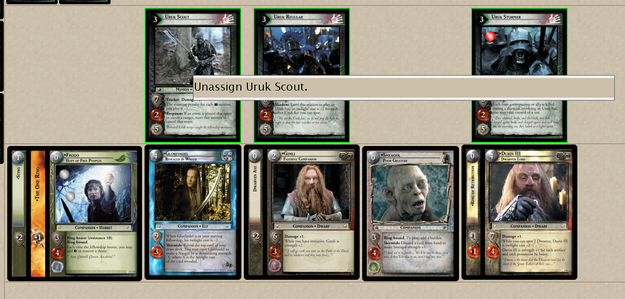
Hint:
- It's considered fair play to offer your opponent that you will assign minions to characters of their choice in case they had erroneously clicked Pass too early and skipped their preliminary assignment, thinking perhaps it was Pass for something else, instead of piling high on their Ring-bearer.
Skirmish indicator
During skirmish participants are marked by orange glow. On the Free Peoples character there is a skirmish indicator displayed that shows current strength & damage values, as well as expected combat outcome:
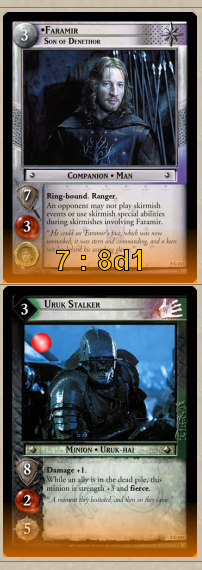
The format is: Free People character's strength (optionally followed by d and Free People character' damage, in case there is at least damage +1) : Minions' strength (optionally followed by d and Minions' damage, in case there is at least damage +1), for example: 8d1 : 4.
The color of the indicator shows expected combat outcome.
Free People character overwhelms minions (dark green):

Free People character wins (light green):

Minion(s) win (orange):

Minion(s) overwhelm Free People character (red):

OTHER OPTIONS
Never surrender! Have fun! Report bugs!
